

This is Part Four in my series on getting chickens. Here are links to previous installments:
As I’d mentioned earlier, we get unusually deep and heavy snow for Western Washington. This is due to our proximity to the Olympic Mountains, just across the Hood Canal. This was the primary reason I chose to build such a beefy coop, versus just buying a kit. I’ve seen those kits up close at the chain farm store I work at part-time—they are NOT built durably.
Now, before I cover the features and construction, a very relevant and real factor at play as this unfolded is the “area-per-chicken.” See, the missus discovered a new shopping addiction: baby chicks. We purchased six. Then the next day, I begrudgingly agreed to four more. I knew that this meant the clock had started. Theses critters would be staying in a box in our home. And if you recall, this isn’t just a coop building project. I was clearing land and digging post holes for other purposes with the borrowed tractor, too. Which is why I had a sudden, harrowing thought on a third day when she took the truck to town.
We’d agreed to get a big, plastic stock-tank for keeping the chicks in. After she’d left for town, the “OMG—What the hell I have I just done?” panic hit me. “I just gave my keys to an addict!”
I hopped onto the group text I share with my co-workers and sent them a video plea for help: “PLEASE do not sell my wife any more chicks!” But of course, the store manager was only too happy to oblige with her parting money. So while I was working on the tractor, chicks 11-14 showed up. To live in my house.
“I’m not building anything bigger than we planned,” I told her, finally making her see the light. Technically 32-square-feet, our coop is actually smaller when you account for the space lost by the thickness of the walls. But with easy division, I showed her that each chicken would be getting only 2.29 square-feet of personal space. I’d managed to stem the flow a bit…

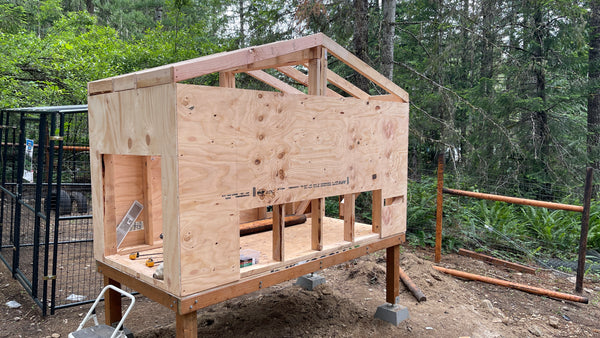
We started with a stout platform built up for ergonomics, the intent being to clean out shavings into a cart with gravity (and bend over as little as possible). I used 4 x 4 legs and 2 x 4 framing, bolted together, with a 3/4" plywood deck that I know will hold me when I need to go in there.
We knew we’d be butting the long side up to the metal, kennel-like poultry pen. I wanted the coop roof to run in the same plane as the pen's, so I opted to run the peak along the short axis, versus the normal length axis. The pen will get a similar metal roof, and both roofs will feed the coming rain collection system.

Knowing that ventilation is important, I added two larger vents near the bottom on opposite corners; and four smaller round ones near the “attic”.
I installed a lumber set of legs and beam to bear the rafters, to stand up to the heavy snow. You’ll also noticed some beefed up construction at the two clean out doors. We built a larger one on one end, with a normal lower door threshold. Because we wanted to have no interference on the other end for cleaning out, we went with no threshold and a much shorter door.
For roosts, I angled some scrap lumber in two pairs, using the backs of the studs as a stop for otherwise loose pieces of the 4-inch post, There are five total, with the bottom one near the coop’s middle, allowing them to go up in either direction. On the floor, we laid out some loose, custom trimmed, vinyl, corrugated panels. They can be swept off through the clean out door; or easily rolled into a U shape and removed. The floor itself has a dozen more holes—with hardware cloth stapled over—for ventilation. They’re each only about the size of a quarter.

We used a barn theme for the paint, and the trim board is 1 X 3. As I type this, I only need to add the metal roofing pieces to the nest boxes. The angled piece on the wall over them (in the thumbnail photo) is a water-stop to keep our notorious autumn rains from running down the wall. We decided to paint the box reverse to give it that "Chic-fil-A" look! I believe this is our favorite feature, because it rolls the egg away into a separate compartment. If you’ve ever wondered about “rolling egg boxes” (we’re calling ours the ‘Egg Roll’ 🤣), here’s what they do and why.

Some hens like to go egg hunting. I’m still a rookie—don’t ask me why. In fact, if you know, please leave a comment below. I built mine by attaching a templated gusset to each of five studs. These plywood blanks have a custom shape to them. The first four inches screws to the side of the stud, and at that point they slope downward a bit. I laid out two and did a mockup with a bottom board to ensure they would roll an egg as expected. We padded the mockup with a small piece of artificial turf to keep our test egg intact.
The bigger compartment, which is the nest box, is fourteen inches deep. But remember, the hen also gets the four inches of space when she walks past the width of the stud and outer plywood wall. It is roomy enough. Her back wall stops about three inches shy of touching the floor, allowing Sir Egg-cellent to roll past into the second compartment, which is about nine inches deep. This is far enough for eggs to roll out of reach of a hen’s craning neck. All said, the Egg Roll hangs off the side of the coop a good twenty-four inches. I’d planned on added some lower bracing to the bottom, but it is so stout that it wasn’t needed.

Once the gussets were attached to the studs, it was simply a matter of screwing on a floor and two back walls; and then building the lids. There is a total of three inches of drop over that twenty-four inch depth. I didn’t calculate the degree of angle because I’m no longer in 10th grade. (And like 99% of you, rather than google that crap, I’d just ask ChatGPT if I really wanted to know.) So there you go.
The future installments of this series will cover things such as predator resistance, snow-load “proofing” the run’s roof, rain collection/distribution, how we’re doing our food, and the four breeds we started with. Thanks for reading along, and please consider sharing with someone!